

Kia Cadenza Console Panel (2014-2019): A Guide to First & Second Generation Differences
Don't buy the wrong part—this guide explains the critical differences between the non-interchangeable 2014-2016 and 2017-2019 Cadenza center consoles.
- The single most critical fact is that 2014-2016 (1st Gen) and 2017-2019 (2nd Gen) Cadenza consoles are NOT interchangeable.
- For 2014-2016 models, you must verify if your car has the Electronic Parking Brake (EPB), as this changes the console layout.
- For all years, verifying your interior color code is essential before buying a used part to ensure a visual match.
- Failure is almost always cosmetic or physical (broken tabs, latches, peeling trim) rather than electrical. Check all mounting tabs on a used part to prevent future rattles.
Critical Alert: Two Generations, Zero Interchangeability
Warning: The 2014-2019 Kia Cadenza spans two distinct vehicle generations, and their center console panels are completely different and NOT interchangeable. Before purchasing, you must identify your vehicle's generation.
- First Generation (VG): 2014, 2015, 2016 model years.
- Second Generation (YG): 2017, 2018, 2019 model years.
Buying a console from the wrong generation will result in a part that does not fit. This guide is structured to help you identify and purchase the correct console for your specific year.
First Generation Kia Cadenza (2014-2016) Console Panel
The first-generation Cadenza featured a flowing interior design. The console panel is specific to these three model years and has its own unique compatibility points to verify.
Key Variants & Compatibility Checks (2014-2016)
- Electronic Parking Brake (EPB): The most significant variation for this generation is the parking brake system. Some Cadenzas came with a traditional foot-pedal parking brake, while higher trims were equipped with an Electronic Parking Brake (EPB) featuring a switch on the center console. A console for a car with EPB will have a specific cutout for the switch that a non-EPB console lacks. You must match the console to your car's brake type.
- Interior Color: Black and beige were common interior colors. Verify your vehicle's color code, typically found on the driver's side door jamb sticker, to ensure a perfect match. Part numbers often end in a suffix (like 'WK' or 'GVF') that can denote color and trim variations.
- Heated/Ventilated Seats: Ensure the replacement console has the correct button cutouts for your vehicle's options, such as heated steering wheel, and heated/ventilated front seats.
Second Generation Kia Cadenza (2017-2019) Console Panel
The Cadenza was fully redesigned for the 2017 model year, introducing a more modern, horizontal interior layout. The center console from these years is wider and features a different arrangement of controls.
Key Variants & Compatibility Checks (2017-2019)
- Wireless Phone Charging: Some Technology and Limited trims included a wireless charging pad located in a cubby at the front of the console. Consoles equipped with this feature will have the necessary wiring and space for the charging module.
- Interior Color & Trim: Like the first generation, multiple color schemes were available, including black and beige. Quilted Nappa leather on Limited trims also came with specific accent colors. Matching the color code is essential. Part number suffixes like 'YBL' (Beige) and 'YBH' indicate the color.
- Panoramic Sunroof: While the sunroof itself is on the roof, it was often bundled in packages with other features that could affect console wiring, such as LED interior lighting. When buying a used console, it's wise to match it to a donor vehicle with a similar option package to ensure all wiring connectors are compatible.
Symptoms of a Damaged Console Panel
Failure of the console panel is almost always due to physical damage or cosmetic wear from use. Mechanical and electrical failures are typically related to the switches or modules housed within the console, not the panel itself.
- Peeling or Chipping Finish: The paint or coating on high-touch areas, especially silver or 'piano black' trim pieces, can peel, bubble, or chip from sun exposure, heat, or the use of harsh chemical cleaners.
- Broken Armrest Latch: The latch that secures the armrest lid is made of plastic and can break from repeated use, preventing the storage compartment from staying closed.
- Cracked or Broken Mounting Tabs: The hidden plastic tabs that hold the console securely to the vehicle's floor can break during removal or from stress. Broken tabs will cause persistent squeaks and rattles.
- Malfunctioning Doors or Covers: The sliding or hinged doors for cupholders and storage cubbies can become stuck or break.
- Faulty Power/USB Ports: While often a separate part, a damaged console can sever the connections to the power outlets or USB ports, causing them to stop working. Sometimes the connection is simply loose behind the panel.
Pro Tip: Many of the switches, modules, and even the armrest lid can be unscrewed and transferred from your old console to the replacement one. If you find a used console in good structural condition but with different options, you may be able to swap your original components over.
Buying a Used Cadenza Console Panel: Inspection Guide
A used OEM console is often the best choice, as it guarantees factory fit and color matching, which is rarely achieved with aftermarket parts. Follow this checklist when buying a recycled part.
- Confirm the Generation: This is the most important step. Match the part to your 2014-2016 or 2017-2019 vehicle.
- Verify Key Options: Check for the presence of the EPB switch cutout (1st gen), wireless charging area (2nd gen), and correct seat heating/cooling button layout. Take a photo of your original console for comparison.
- Inspect All Mounting Points: Flip the console over and carefully check every screw hole and plastic clip receiver for cracks or stress marks. This is critical for a rattle-free installation.
- Test Mechanical Parts: Open and close the armrest multiple times, ensuring the latch clicks securely. Operate any sliding doors or covers to feel for smooth movement.
- Examine the Finish: Look for deep scratches, peeling chrome/paint, and stains from chemical cleaners. Pay close attention to the areas around the cupholders and shifter, which see the most wear.
- Check the Armrest: Inspect the leather or vinyl on the armrest for rips, punctures, or collapsed padding.
Replacement Overview
Replacing the center console is a manageable DIY project for those with patience and basic tools. The process takes approximately 1-2 hours.
- Difficulty: 2 out of 5
- Tools Needed: Plastic trim removal tool kit, Phillips screwdriver, socket set (10mm or 12mm is common).
General Steps (may vary slightly between generations):
- Disconnect the Battery: Before working on any interior components with wiring, disconnect the negative battery terminal.
- Remove Shifter Knob and Trim: The shifter knob usually pulls straight up or has a small set screw. Use plastic pry tools to gently lift the shifter trim panel.
- Remove Screws: Locate and remove the screws holding the console in place. They are typically found on the sides of the console in the footwells and inside the main storage bin.
- Disconnect Wiring: Carefully lift the console slightly and reach underneath to disconnect all electrical connectors for switches and power ports. These connectors have small release tabs that must be pressed.
- Remove Console: Once all screws and connectors are free, the entire assembly can be lifted out of the vehicle. 🎬 Watch: Step-by-step Kia center console removal guide
- Transfer Components: If necessary, move your old switches, control modules, and ports to the new console before beginning reinstallation.
Cost Comparison
| Part Type | Estimated Cost |
|---|---|
| New OEM | $75 - $150, depending on generation and options. |
| Used OEM | $100 - $300, depending on condition and included components. |
| New Aftermarket | Not commonly available. |
| Shop Labor | $120 - $250. |
Known Recalls and Service Bulletins
There are no specific recalls or Technical Service Bulletins (TSBs) from Kia or the NHTSA that relate directly to the failure of the center console panel itself. Issues like peeling trim or broken latches are typically handled as standard repairs.
Frequently Asked Questions (FAQ)
How do I know if I have a first or second generation Cadenza?
The easiest way is by the model year. 2014-2016 models are first generation. 2017-2019 models are second generation. They have distinctly different front-end styling and interior dashboard designs.
Will a console from a 2017 Cadenza fit my 2015 model?
No. The parts are from two different vehicle generations and are not physically compatible. The shape, size, and mounting points are completely different.
Where do I find my car's interior color code?
The interior color code is usually printed on the vehicle identification sticker located on the driver's side door jamb. This sticker also contains the VIN and production date.
Can I just replace the broken armrest latch?
Generally, the latch mechanism is not sold as a separate part from the armrest lid or the upper console assembly. The most common solution is to replace the entire armrest lid or find a used console assembly to source the part from.
Helpful Videos
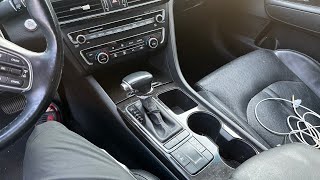
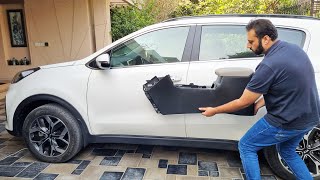
Technical Specifications
OEM Part Numbers: 84610-F6000YBL 84610F6000YBH 84611-3RAA0GVF 846113RAA0GVF 846113RAA0WK 84640-3RAA0WK 846403RAA0WK 84640F6100AYK 84650-3RPP0BG2 846503RPP0BG2 84650F6100FHV 84660-3RAA0GCF 84660-3RAA0GCG 84660-3RBA0AS 84660-3RBA0HAW
Part selection is primarily based on vehicle generation (2014-2016 vs 2017-2019), interior color code, and specific options like Electronic Parking Brake (EPB) or wireless charging.
We Have This Part in Stock



The information in this article is provided for general reference and educational purposes only. Vehicle specifications, procedures, and part compatibility can vary by production date, trim level, and region. Always consult your vehicle's factory service manual and verify part numbers before purchasing or performing repairs. Safety-critical components such as airbags, seat belts, and braking systems should be installed by a qualified professional.
- Kia Cadenza:
- 🎬 Helpful Videos
- 🛍️ Shop This Part
- Critical Alert: Two Generations, Zero Interchangeability
- First Generation Kia Cadenza (2014-2016) Console Panel
- Key Variants & Compatibility Checks (2014-2016)
- Second Generation Kia Cadenza (2017-2019) Console Panel
- Key Variants & Compatibility Checks (2017-2019)
- Symptoms of a Damaged Console Panel
- Buying a Used Cadenza Console Panel: Inspection Guide
- Replacement Overview
- General Steps (may vary slightly between generations):
- Cost Comparison
- Known Recalls and Service Bulletins
- Frequently Asked Questions (FAQ)
- 🎟️ Get 5% Off