

2017-2025 Buick Envision Console Panel: Navigating Generations, Colors, and Options
This guide covers the critical differences between Envision generations and how to choose the correct used console panel by matching color and power outlet options.
- The console panels for 1st Gen (2017-2020) and 2nd Gen (2021-2025) Envisions are completely different and not interchangeable.
- You must verify if your vehicle has the optional 110V power outlet (Option KD4/KI6) and buy a console that matches this configuration.
- Match the interior color code (found on the SPID label in the glove box) to ensure a cosmetic match. Common colors include Jet Black and Light Neutral/Whisper Beige.
- When buying used, the most critical inspection point is the underside; ensure all mounting tabs are intact to prevent future rattles.
Key Differences: 1st Gen (2017-2020) vs. 2nd Gen (2021-2025)
Before purchasing a replacement console panel for a Buick Envision, it is critical to identify the vehicle's generation. The console panels are entirely different and are not interchangeable between these two groups.
- First Generation (2017-2020): These models feature a more traditional console layout with a conventional gear shift lever.
- Second Generation (2021-2025): These models use a push/pull button-style gear selector, leading to a completely different console design and layout. They also feature a large, sweeping infotainment display that integrates differently with the console structure.
Warning: The most significant error when buying this part is purchasing for the wrong generation. Always confirm the vehicle's model year before ordering.
Symptoms of a Bad or Failing Console Panel
Failure of a console panel is typically related to physical damage or the failure of integrated components, rather than a mechanical breakdown of the console itself.
- Physical Damage: Cracks, deep scratches, or gouges on the surface are common. Mounting tabs on the underside can break during removal for other repairs, leading to a poor fit.
- Broken Components: The latch for the armrest/storage compartment lid is a high-wear item that can break, preventing the lid from staying closed.
- Rattles and Squeaks: Loose or broken mounting points will cause the console to vibrate and create noise while driving. This was a noted issue in some TSBs for related interior panels.
- Worn or Peeling Finish: The trim finish, especially around cupholders and the shifter, can peel or wear away from use, spills, and cleaning products.
- Inoperative Electronics: While not part of the console structure itself, issues with integrated components like dead USB ports, faulty 12V/110V outlets, or non-functional switches are common reasons for console disassembly and potential replacement.
Known Issues, TSBs, and Recalls
While there are no recalls specifically for the main console structure, several Technical Service Bulletins (TSBs) and owner complaints relate to components within or attached to it.
- TSB 22NA035: On some 2021-2022 models, owners noted that the chrome trim around a dash vent near the console did not illuminate correctly.
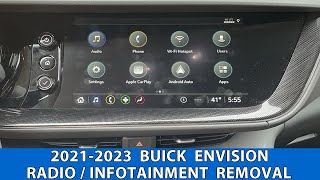
- Infotainment and Electrical Glitches: Owners of various model years have reported problems with the infotainment screen freezing, going blank, or being unresponsive. These issues often require accessing wiring and modules located within the center console area for diagnosis.
- Owner Complaints: Some owners of newer (2021+) models have noted the use of hard plastics and a control layout that feels less premium or intuitive, particularly the push/pull gear selector. 🎬 See how to remove the gear selector assembly
No widespread recalls directly affect the console panel itself for the 2017-2025 model years.
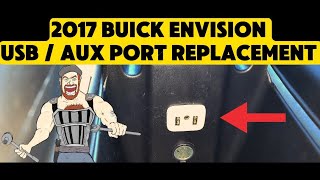
Pro Tip: Many electronic issues, like a non-charging USB port, are often due to a faulty module or wiring harness, not the plastic console itself. 🎬 Watch: How to replace the USB port and auxiliary jack Diagnose the specific electronic component before replacing the entire console assembly.
Buying a Used 2017-2025 Envision Console Panel: A Step-by-Step Guide
Purchasing a used OEM console is an excellent way to save money, but careful verification is required to ensure you get the right part in good condition.
Step 1: Verify Your Power Outlet Option (The KD4/KI6 Trap)
The most critical compatibility check is for the optional 110-volt household power outlet. This feature was available on higher trim levels, like the Avenir.
- Consoles for vehicles WITH the 110V outlet have a specific cutout and mounting provisions for it, typically on the rear-facing side of the console.
- Consoles for vehicles WITHOUT the 110V outlet will have a blank panel or a different configuration.
The GM option codes for this feature are often KD4 or KI6. You must match the console to your vehicle's specific equipment. The parts catalog clearly distinguishes between consoles 'with 110 Volt' and 'without 110 Volt'.
Step 2: Match Your Interior Trim Color
Buick offered several interior color schemes that must be matched precisely to avoid a mismatched look. Common colors include:
- Jet Black / Ebony
- Light Neutral / Whisper Beige / Sandstone
- Garnet with Ebony accents (2nd Gen)
- Cool Gray with Slate Blue accents (2nd Gen)
The best way to confirm your color is by finding the Service Parts Identification (SPID) label, which is typically located in the glove box. This label contains a list of three-character codes for every option on your vehicle, including the interior trim color.
Step 3: Physical Inspection Checklist for a Recycled Part
When inspecting a used console panel in person or via detailed photos:
- Flip it Over: Check that all plastic mounting tabs and screw bosses are intact. These are fragile and easily broken during removal. A console with broken tabs will not install securely and will likely rattle.
- Test the Latch: Open and close the armrest lid multiple times to ensure the latch mechanism engages securely.
- Inspect Surfaces: Look for deep scratches, chemical stains from cleaners, and peeling trim, especially in high-contact areas like the cupholders and side panels.
- Check for Completeness: Note which trim pieces, vents, and panels are included. Some pieces may need to be transferred from your old console.
Step 4: Confirm What's Included
A used console is often sold as a bare plastic shell. Verify if your purchase includes the switches, power outlets, wiring harnesses, or the shifter mechanism. In most cases, you will need to carefully transfer these components from your original console to the replacement one. A 'complete' assembly with electronics included can be a good value, but only if you can confirm the donor vehicle's options match yours perfectly.
Replacement Difficulty & Labor Estimates
- Difficulty Rating: 3 out of 5
- Estimated Time: 2.0 - 3.0 hours
- DIY Feasible: Yes, for a patient DIYer with the right tools.
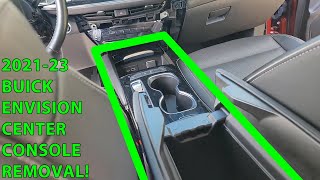
Replacing the center console is an involved process that requires careful removal of multiple surrounding trim panels. The process generally involves using plastic trim removal tools to pry off side panels and the shifter bezel, removing numerous screws (often 7mm), and carefully disconnecting a series of complex electrical connectors. The biggest risk for a DIYer is breaking the plastic clips on the console or adjacent dash panels, so patience is key.
🎬 Watch: Step-by-step center console removal guideCost Comparison: Envision Console Panel
| Part Type | Estimated Cost | Notes |
|---|---|---|
| New OEM | $500 - $800+ | Price for a bare console from a dealer. Varies significantly by part number and options. |
| New Aftermarket | $75 - $200+ | Generally not available as a complete assembly. Individual components like armrest covers may be found. |
| Used OEM | $200 - $450 | The most common and cost-effective option. Price depends on condition and whether electronics are included. |
| Shop Labor | $250 - $550 | Based on 2-3 hours of labor at a typical shop rate. |
Frequently Asked Questions (FAQ)
How do I find my Buick's interior color code?
Look for the Service Parts Identification (SPID) sticker, which is a silver or white label usually located inside the glove compartment. It contains a list of all the option codes for your specific vehicle. The interior trim code will be listed there, which you can then match with the seller's part description.
Can I install a console with the 110V outlet if my car doesn't have it?
Physically, it might fit, but you will have an inoperative outlet and a hole in your console. The vehicle-side wiring harness to power the outlet will not be present, making it a non-functional upgrade without extensive and complex electrical work.
Do I need to reprogram anything after replacing the console?
No. The console itself is just a plastic structure. As long as you are transferring all of your original electronic modules, switches, and the shifter into the new console, no programming is required. The vehicle's computer communicates with those modules, not the console housing.
What tools are needed to replace the Envision's center console?
You will need a set of plastic trim removal tools, a 7mm socket with an extension, a Phillips head screwdriver, and possibly a small flathead screwdriver for releasing electrical connector tabs. A video guide for the 2021-2023 models shows the complexity and number of clips and hidden screws involved.
Helpful Videos
Technical Specifications
OEM Part Numbers: 26486392 BRU05214 84035876 84122355 84122356 84254707 84340949 84340959 84621974 84723766 84723773 84723774 84794487 84802288 84835539
Key variations are based on model year generation (2017-2020 vs. 2021-2025), interior color (Jet Black, Light Neutral, etc.), and the presence of the 110V power outlet (Option KD4/KI6).
We Have This Part in Stock



The information in this article is provided for general reference and educational purposes only. Vehicle specifications, procedures, and part compatibility can vary by production date, trim level, and region. Always consult your vehicle's factory service manual and verify part numbers before purchasing or performing repairs. Safety-critical components such as airbags, seat belts, and braking systems should be installed by a qualified professional.
- Buick Envision:
- 🎬 Helpful Videos
- 🛍️ Shop This Part
- Key Differences: 1st Gen (2017-2020) vs. 2nd Gen (2021-2025)
- Symptoms of a Bad or Failing Console Panel
- Known Issues, TSBs, and Recalls
- Buying a Used 2017-2025 Envision Console Panel: A Step-by-Step Guide
- Step 1: Verify Your Power Outlet Option (The KD4/KI6 Trap)
- Step 2: Match Your Interior Trim Color
- Step 3: Physical Inspection Checklist for a Recycled Part
- Step 4: Confirm What's Included
- Replacement Difficulty & Labor Estimates
- Cost Comparison: Envision Console Panel
- Frequently Asked Questions (FAQ)
- 🎟️ Get 5% Off