

2021-2024 Model Y & 2021-2023 Model 3 Center Console: Fixing Rattles, Looseness, and Squeaks
Your definitive guide to diagnosing and fixing the common noises and issues with the refreshed Tesla Model 3 and Model Y center console.
- Most console 'problems' are minor rattles and squeaks from loose items or trim panels, not broken brackets.
- This part is for the 2021+ 'refreshed' console design and will NOT fit 2017-2020 Model 3 or 2020 Model Y vehicles.
- If replacing the entire console assembly, you MUST swap the security controller module from your old unit to the new one to avoid disabling your car keys.
- Diagnose noises carefully by first emptying the console before assuming a part is broken; simple fixes like felt tape often solve the issue.
Compatibility: The 2021 Center Console Refresh

Important: Tesla significantly updated the center console for the 2021 model year in both the Model 3 and Model Y. This guide applies specifically to the refreshed 2021-2024 Model Y and 2021-2023 Model 3. These consoles feature a matte finish and a sliding cover. The earlier 2017-2020 Model 3 and 2020 Model Y used a console with a glossy piano-black finish and a flip-up lid. Parts are not interchangeable between these two designs.
Symptoms of Console Problems

Problems with the center console are rarely catastrophic but can be a significant source of annoyance in Tesla's otherwise quiet cabin. Most issues are related to noise.
- Rattling or Buzzing: This is the most common complaint. It can be caused by loose items in the storage bins, a vibrating phone on the wireless charger, or the sliding door mechanism itself.
- Creaking or Squeaking: Often occurs when leaning on the armrest, cornering, or going over bumps. This is typically caused by plastic panels rubbing against each other or against the sides of the front seats.
- Loose or Wobbly Console: If the entire console assembly feels loose, it could indicate that the main mounting bolts have loosened, or in rare cases, that a primary structural bracket has cracked.
- Armrest Won't Latch: The armrest latch mechanism can break, often from being slammed shut or from an impact, preventing the lid from staying closed.
- Sliding Door Resistance: The sliding cover may become difficult to open or close, often making a rubbing or dragging sound.
Known Issues and Solutions

Diagnosing and Fixing Noises
Before assuming a part is broken, it's crucial to isolate the source of the noise. Most rattles and squeaks are not due to a failed bracket but are simple fitment issues.
- Empty the Console: Remove all items from the storage bins, cup holders, and trays. Go for a drive. If the noise is gone, the cause was loose items like keys, coins, or sunglasses. The solution is a simple console organizer with a soft or flocked lining.
- Check the Sliding Door: If the noise persists, try driving with the sliding door fully open, then fully closed. Press down gently on the door while driving over a bumpy road. If this changes or stops the noise, the rattle is in the door mechanism. Some owners have fixed this by applying thin felt or foam tape along the edges of the track to dampen vibrations.
- Address Panel Creaks: If the noise sounds like creaking plastic when you lean on the armrest, the cause is likely plastic-on-plastic rubbing. Some owners have successfully eliminated these noises by applying felt tape to the contact points between panels or by using a silicone-based lubricant on the armrest hinges. In some cases, the creak comes from the side of the seat rubbing against the console; a leather conditioner or saddle soap applied to the side of the seat has been reported to solve this.
Broken Armrest Latch
The armrest latch is a known failure point, especially after a hard impact. While the latch itself may not be sold separately, the entire armrest assembly can be purchased from Tesla and is relatively easy to replace. It involves removing the rear console vent panel and a few Torx screws.
Buying a Used Console Bracket or Assembly

Since a broken structural bracket is uncommon, first confirm that the issue isn't a loose bolt or a different rattling part. If you've determined a bracket is cracked or you need to replace the entire console, a used OEM part is an excellent value.
What to Inspect on a Used Part
- For a Single Bracket: If you are buying a specific bracket like the rear support (Part No. 1108516-00-A), inspect it closely for hairline cracks, especially around the screw mounting holes. Ensure it is not warped or bent.
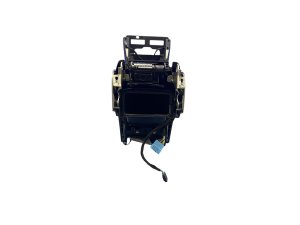
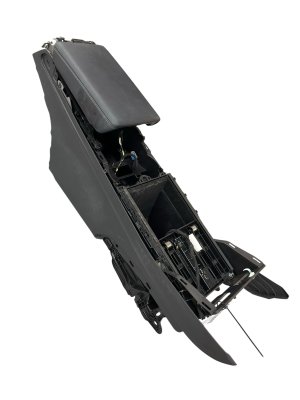
- For a Complete Assembly: This is more common. Check for major cracks or damage to the main body. Operate the sliding door to ensure it moves smoothly without binding. Test the armrest latch to make sure it clicks securely. Check that the wireless charging pad surface is not damaged.
Warning: Swap the Security Controller: The vehicle's key card authentication module (security controller) is located within the center console assembly, typically under the cup holder area. If you replace the entire console, you MUST transfer the security controller from your original console to the new one. Failure to do so can cause the vehicle to not recognize your keys and may 'brick' the car, preventing it from starting. This involves removing a few screws to swap the small electronic module.
Cost Comparison
Fixing console issues can range from a few dollars for DIY materials to over a thousand dollars for a new part from the dealer.
| Part or Service | Estimated Cost |
|---|---|
| New OEM Complete Console Assembly (from Tesla) | $850 - $1,000 |
| Used OEM Complete Console Assembly | $250 - $450 |
| Used OEM Console Bracket (Individual) | $25 - $75 |
| Shop Labor to Swap Console Assembly | $100 - $200 |
| DIY Rattle-Fix Materials (Felt Tape, etc.) | $10 - $20 |
Replacement Difficulty & Procedure

Replacing the entire center console assembly is required to access its internal structural brackets. While it involves many steps, it is a feasible DIY project for those comfortable with basic tools.
- Difficulty: 3 out of 5
- Estimated Time: 1 - 2 hours
- Tools Required: 10mm socket (deep socket recommended), Torx T20 driver, plastic trim removal tools.
Simplified Replacement Steps
The official Tesla service manual provides detailed instructions. The general process is as follows:
- Power off the vehicle from the touchscreen and disconnect the low-voltage battery.
- Remove the carpeted side panels from the front of the console using a trim tool.
- Remove the rear vent panel at the back of the console.
- Remove the exposed 10mm bolts (typically two in the front footwells, two at the rear).
- Disconnect the electrical connectors for the USB ports, NFC reader, and rear screen (if equipped).
- With the help of an assistant, carefully lift the console assembly out of the vehicle.
- If replacing the full assembly, transfer the security controller module from the old unit to the new one.
- Installation is the reverse of removal.
Frequently Asked Questions (FAQ)
My console is rattling. Is the bracket broken?
Probably not. The most common cause of rattles is loose items in the storage bins, followed by vibrations in the sliding door or other trim pieces. A broken structural bracket is rare. Diagnose the noise by emptying the console and testing the sliding door before assuming a part has failed.
Will this console fit my 2020 Model Y?
No. This console is for the 2021-2024 Model Y and 2021-2023 Model 3. The 2020 Model Y has the older generation console with a glossy black finish and a different design. While some owners have retrofitted the newer console into older cars, it is not a direct swap and may have wiring differences.
Can I just buy a new armrest latch if mine is broken?
Tesla typically sells the armrest as a complete assembly rather than just the small latch component. A used armrest assembly is a cost-effective option. The replacement process is straightforward and does not require removing the entire center console.
Is it safe to replace the center console myself?
Yes, for a DIYer with basic tools, it is a manageable job. The most critical step is remembering to swap your original security controller module into the replacement console to avoid key recognition issues. Following the official service procedure and disconnecting the battery is essential for safety.
Technical Specifications
OEM Part Numbers: 1108516-00-A (Rear Lower Support Bracket) 1087897-00-B (Center Console Base Frame) 1755503-00-A (Complete Console Assembly 2.0) 1755503-72-C (Complete Console Assembly 2.0) 1582886-00-B (Armrest Assembly) 1777100-00-C (Armrest Assembly)
Mounting Hardware: Primarily 10mm bolts and Torx T20 screws for internal components.
We Have This Part in Stock


The information in this article is provided for general reference and educational purposes only. Vehicle specifications, procedures, and part compatibility can vary by production date, trim level, and region. Always consult your vehicle's factory service manual and verify part numbers before purchasing or performing repairs. Safety-critical components such as airbags, seat belts, and braking systems should be installed by a qualified professional.
- Tesla Y:
- Tesla 3:
- 🛍️ Shop This Part
- Compatibility: The 2021 Center Console Refresh
- Symptoms of Console Problems
- Known Issues and Solutions
- Diagnosing and Fixing Noises
- Broken Armrest Latch
- Buying a Used Console Bracket or Assembly
- What to Inspect on a Used Part
- Cost Comparison
- Replacement Difficulty & Procedure
- Simplified Replacement Steps
- Frequently Asked Questions (FAQ)
- 🎟️ Get 5% Off