

2021-2023 Tesla Model 3 Center Console Bracket: Fixing Looseness and Verifying the Gen 2 Design
Your definitive guide to diagnosing a loose or rattling second-generation Model 3 center console and sourcing a reliable used replacement.
- This bracket is for the 2021-2023 'Gen 2' console with a sliding lid; it is NOT compatible with the 2017-2020 'Gen 1' flip-lid console.
- Failure symptoms are typically noises like rattles and creaks or a general feeling of looseness, not a catastrophic break.
- Replacement is DIY-friendly, requiring basic tools and the removal of the entire console assembly as one unit.
- Buying a complete used OEM console assembly is the most common and cost-effective repair, costing significantly less than a new unit from Tesla.
Identifying the Gen 2 Console: The First Step
Warning: This bracket is part of the second-generation (Gen 2) center console assembly, which Tesla introduced for the 2021 model year. It will not fit 2017-2020 Model 3 vehicles with the original flip-up piano black console. Before purchasing, you must verify your vehicle has the newer console design.
The easiest way to tell the difference is by the main storage lid and finish.
- 2021-2023 (Gen 2): Features a sliding lid, a matte or satin gray finish, and two USB-C ports inside the front storage area.
- 2017-2020 (Gen 1): Has a flip-up lid, a glossy piano black finish, and typically used USB-A ports.
Attempting to fit a Gen 2 console or its bracket into a Gen 1 car is not a direct swap and can cause issues with wiring and security modules that authenticate the key card.
Symptoms of a Failing Console Bracket
Failure of the console bracket is almost always related to noise, vibration, and harshness (NVH), rather than a complete structural collapse. Because electric vehicles are so quiet, interior rattles and creaks become much more noticeable.
- Loose or Wobbly Console: The entire center console assembly may feel loose, shifting slightly when you lean on the armrest or during cornering. This indicates that the mounting points on the bracket or where it bolts to the car body may be compromised.
- Rattling and Creaking Noises: You may hear persistent rattling or creaking sounds coming from the center console area, especially when driving over bumps or on rough roads. This can be caused by a stress crack in the bracket or loose fasteners.
- Misaligned Panels: The trim panels around the console may appear uneven or have inconsistent gaps, suggesting the underlying structure has shifted or warped.
- Difficulty with Sliding Lid: In some cases, a defect in the console's plastic molding, which is part of the larger assembly, can cause the sliding lid to scratch or bind. While not a bracket failure, it is a known issue with the console assembly.
Buying a Used Console Bracket Assembly
Since the bracket is the core of the console, it is almost always sold as a complete used center console assembly. This is often the most cost-effective solution. Here’s what to check before buying a used unit.
1. Physical Inspection
- Check All Mounting Points: Carefully inspect the six main bolt holes (two at the front, two in the middle, and two at the rear) where the console attaches to the vehicle floor. Look for any cracks, stress marks, or elongated holes. This is the most critical area.
- Examine the Armrest Hinge: Open and close the armrest. Check the hinge points for any cracks or signs of excessive wear.
- Look for Hidden Damage: Remove any drop-in trays or mats. Shine a light inside the storage compartments and look for cracks in the plastic, especially at the bottom and corners.
- Verify All Clips and Tabs: Check the sides and rear where the carpeted side panels and rear vent cover attach. Ensure all small plastic clips and tabs are intact, as broken ones can lead to rattles.
2. Why Used OEM is a Smart Choice
For a part like this, a used OEM (Original Equipment Manufacturer) assembly is usually a better choice than a new aftermarket alternative, if one were available. The OEM part is built to Tesla's exact dimensional specifications and material stiffness, which is essential for a perfect, rattle-free fit. Aftermarket structural plastics can sometimes be more brittle or have slight molding variations that introduce fitment problems and new noises.
| Part Type | Estimated Cost | Notes |
|---|---|---|
| New OEM | $800 - $1,000 | Purchased as a complete assembly directly from Tesla. |
| Used OEM | $400 - $550 | A complete, tested assembly from a vehicle recycler is the best value. |
| New Aftermarket | Not Available | Aftermarket options are limited to accessories like organizers and covers, not the main structural assembly. |
| Shop Labor | $150 - $300 | Based on 1-2 hours of labor. Tesla's official flat rate time is under an hour. |
Known Issues, TSBs, and Recalls
As of mid-2026, there are no official recalls or widespread Technical Service Bulletins (TSBs) from Tesla specifically for the 2021-2023 Model 3 center console bracket or assembly. Most owner complaints are related to general cabin rattles, not a specific, repeated failure of this part. NHTSA investigations for this vehicle have focused on other areas like steering systems and door latches.
Replacement Overview
Replacing the center console is a straightforward job that a DIYer with basic tools can complete in about 1-2 hours. The official Tesla service procedure shows the entire console is removed as one unit.
- Difficulty: 2 out of 5
- Tools Required: 10mm socket, Torx T20 socket, plastic trim removal tools.
Pro Tip: Before starting, move both front seats all the way forward and up to get easy access to the rear console bolts and panels.
High-Level Steps:
- Disconnect Power (Recommended): Although some guides skip this, it's safest to disconnect the 12V power supply.
- Remove Rear and Side Panels: Use a trim tool to carefully pop off the rear vent panel and the carpeted side panels on the driver and passenger sides.
- Disconnect Wiring: Unplug the electrical connector at the rear of the console and another one at the front on the passenger side (this may include the NFC key card reader and USB ports).
- Remove Mounting Bolts: Undo the six 10mm bolts that secure the console frame to the vehicle floor.
- Remove the Console: With an assistant, tilt the console up and slide it backward and out of the passenger door.
- Installation: Installation is the reverse of removal. Place the new console, align the bolt holes, secure the bolts, reconnect the wiring, and snap all trim panels back into place. Test the key card and USB ports before finishing.
Frequently Asked Questions (FAQ)
Can I use this console assembly to upgrade my 2020 Model 3?
No, this is not a simple plug-and-play upgrade. The Gen 1 (2017-2020) and Gen 2 (2021-2023) consoles have different wiring harnesses, mounting points, and security modules for the key card reader. While a conversion is physically possible, it requires significant custom work.
Is a rattling noise from my console always a sign the bracket is broken?
No, not at all. Before assuming the bracket is broken, check for simpler causes. The most common source of noise is loose items inside the storage compartments, like coins, keys, or sunglasses. Aftermarket cup holder inserts or organizers can also cause noise if they don't fit perfectly. Try emptying the console completely to see if the noise disappears.
Can I just tighten the bolts to fix a loose console?
Sometimes, yes. If the console feels wobbly, you can remove the side and rear trim panels to access the six main mounting bolts. Check if they are snug. If they have loosened over time, tightening them may solve the problem. However, if the plastic around the bolt holes is cracked, the bracket or entire assembly will need to be replaced.
Do I need to have the car reprogrammed after replacing the center console?
No. As long as you are swapping a like-for-like Gen 2 console, there is no programming required. The console itself contains passive components like USB ports and the NFC reader coil, which do not need to be paired to the vehicle. Simply reconnecting the original wiring is all that's needed.
Technical Specifications
OEM Part Numbers: 1614943-00 1614943-00-A 1614943-70-C 1755503-70-C
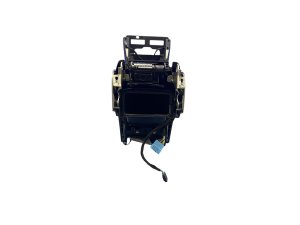
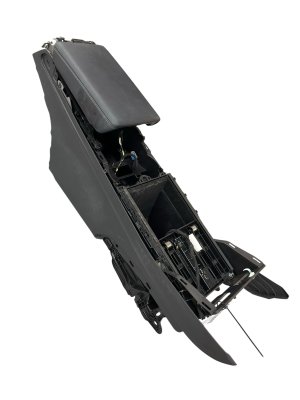
Sold as a complete center console assembly. Includes main structural bracket, storage bins, and armrest frame. Designed for the second-generation (2021+) Model 3 interior.
We Have This Part in Stock


The information in this article is provided for general reference and educational purposes only. Vehicle specifications, procedures, and part compatibility can vary by production date, trim level, and region. Always consult your vehicle's factory service manual and verify part numbers before purchasing or performing repairs. Safety-critical components such as airbags, seat belts, and braking systems should be installed by a qualified professional.
- Tesla 3:
- 🛍️ Shop This Part
- Identifying the Gen 2 Console: The First Step
- Symptoms of a Failing Console Bracket
- Buying a Used Console Bracket Assembly
- 1. Physical Inspection
- 2. Why Used OEM is a Smart Choice
- Known Issues, TSBs, and Recalls
- Replacement Overview
- High-Level Steps:
- Frequently Asked Questions (FAQ)
- 🎟️ Get 5% Off