

2021-2024 Honda Odyssey Console: Fixing a Dead Wireless Charger
Your guide to diagnosing common issues like a faulty wireless charger, and how to choose the right used replacement console for your Odyssey.
- The most common failure is the wireless phone charger, which is specific to Elite (US) and Touring (Canada) trims.
- Before buying a used console, you MUST verify it has the correct features for your trim level, as consoles are not all interchangeable.
- If only the wireless charger is broken, you can often replace just the charger module (part # 08U58-THR-100C) instead of the entire console.
- Replacement is a simple DIY task, requiring the removal of four 10mm bolts and unclipping two side panels.
Symptoms of a Failing Center Console
Failures in the Odyssey's center console can be either physical or electronic. Given the integrated technology, electronic issues are common.
1. Wireless Phone Charger Stops Working or is Intermittent
This is the most reported electronic issue. The phone may begin to charge and then stop, or it may not charge at all, even when correctly placed on the pad. A Technical Service Bulletin (TSB) issued for other Honda models with similar chargers points to software compatibility issues between the charger and certain phones, with the official fix being a replacement of the charger unit. The indicator light on the charger may flash or not illuminate at all.
2. Center Display and Audio Shut Down ('MOST Net Off' Error)
In some cases, a failure within the console's wiring or control unit can cause a complete shutdown of the infotainment system. Owners have reported the speakers popping, followed by the main screen going black with a 'network communication lost MOST net off' message. This appears to be a more severe, though less common, electronic failure that may be linked to heat buildup within the console.
3. Dead USB or 12V Power Ports
The power ports integrated into the console can fail, leaving you unable to charge devices. This is typically caused by a blown fuse, a loose connection in the wiring harness behind the console, or a failure of the port itself.
4. Physical Damage
Like any interior part, the console is susceptible to physical wear and tear. Common issues include:
- Broken Lid or Latch: The main storage compartment lid may not stay closed or the latch mechanism can break from repeated use.
- Cracked or Scratched Trim: Plastic trim pieces can get scratched or cracked from daily use.
- Rattles and Squeaks: Loose internal components or mounting bolts can cause annoying noises while driving.
Known Issues, Recalls, and Technical Service Bulletins (TSBs)
As of this writing, there are no specific recalls for the center console assembly on the 2021-2024 Honda Odyssey. However, related information is available:
- Wireless Charger TSB (Related Models): Honda issued TSB 24-061 for 2019-2023 Passport, Pilot, and Ridgeline models for a symptom where the 'Wireless Charger Stops Charging'. The cause is cited as 'Software specifications can cause some phones to have issues charging', and the corrective action is to replace the wireless charger unit. This strongly suggests a similar root cause for Odyssey models experiencing the same problem.
- Rearview Camera Display Recall: A recall was issued for a faulty communication cable connector that could cause the rearview camera image to not appear on the center display. This is not a failure of the console itself, but of a related system that uses the same screen.
Compatibility Warning: The single most important factor when purchasing this part is the wireless phone charger. In the US market, this feature is typically found on the Elite trim. In the Canadian market, it is found on the Touring trim. Consoles from lower trims (like the LX) will not have the charger or the necessary wiring. Always verify the features of the donor vehicle.
Buying a Used 2021-2024 Odyssey Center Console
A used OEM console is often the best value, providing perfect fit and color match. However, careful inspection is key, especially with the integrated electronics.
What to Inspect on a Used Console
- Verify the Features: Confirm the console has the options your vehicle is equipped with, primarily the wireless charging pad. Ask the seller for the VIN of the donor vehicle to confirm its trim level (Elite in US, Touring in Canada).
- Check the Wiring Harness: Inspect the electrical connectors on the side or bottom of the console. Ensure the wiring harness has not been cut or damaged during removal. All connectors should be intact.
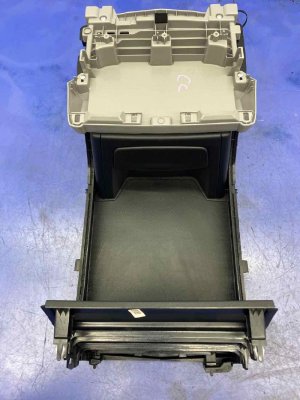
- Test the Lid and Latches: Open and close the main storage lid multiple times. Ensure it latches securely and opens smoothly. Check any other sliding trays or doors for proper function.
- Inspect Mounting Points: Look at the bottom and sides of the console. All plastic mounting tabs and bolt holes should be intact and free of cracks. Broken tabs are a major red flag and can lead to a loose, rattling installation.
- Examine Cosmetic Condition: Check for deep scratches, scuffs, or discoloration on the plastic and trim surfaces. For a part this new, you should expect minimal wear.
Cost of Replacement
Replacing the center console can be expensive if buying new from a dealer, making a used OEM part an attractive option.
| Part Type | Estimated Cost |
|---|---|
| New OEM (Complete Assembly) | $800 - $1,500+ (Estimated, based on component prices) |
| New OEM (Wireless Charger Module Only) | $240 - $330 |
| Used OEM (Complete Assembly) | $250 - $600+ (Depending on condition and features) |
| Shop Labor | $120 - $250 |
Installation Overview
Replacing the center console is a manageable DIY job for most people. The process is straightforward and requires basic tools.
- Difficulty: 2/5
- Estimated Time: 1-1.5 hours
- Tools Required: 10mm socket, plastic trim removal tools.
General Steps:
- Move the front seats all the way back for access.
- Using a plastic trim tool or your fingers, lift up the rubber mats at the front and rear of the console's lower storage tray to expose the mounting bolts.
- Remove the two 10mm bolts at the front and the two 10mm bolts at the rear.
- Gently pull outwards on the plastic side panels near the front of the console (by the footwells) to unclip them. They pull straight off.
- On the passenger side, locate and disconnect the electrical connectors for the power ports and wireless charger.
- The entire console assembly can now be carefully lifted up and removed from the vehicle.
- Installation is the reverse of removal. Be sure to reconnect all electrical harnesses before bolting the new console in place.
Pro Tip: If only your wireless charger has failed, you can often replace just the charger module (Part No. 08U58-THR-100C) without replacing the entire console. This is a more cost-effective repair.
Frequently Asked Questions (FAQ)
Can I install a console with a wireless charger into my Odyssey that didn't come with one?
This is not recommended. The vehicle's main wiring harness in lower trims is typically missing the necessary connector to power the wireless charger. It would require extensive and complex custom wiring to add this functionality.
Can I just replace the broken console lid?
Yes, in many cases the lid, cupholder inserts, and other small trim pieces are available to be purchased separately from the dealer. This can be a cost-effective fix for minor physical damage.
Why did my wireless charger stop working?
Based on Honda's service information for similar parts, the failure is often due to software or firmware incompatibilities between the charger and certain phone models. It is less commonly a complete hardware burnout, but in either case, the solution is typically to replace the charger module.
Is the installation difficult? Can I do it myself?
The installation is considered easy and is very feasible for a DIYer. It primarily involves removing four bolts and a few clip-on trim panels, making it a simple job that can be done in about an hour with basic tools.
Part Number Reference
| Part Name | Part Number | Approx. New OEM Price |
|---|---|---|
| Wireless Charger Module Kit | 08U58-THR-100C | $240 - $330 |
| Cup Holder Assembly | 83416-THR-A11ZA | $75 - $110 |
| Left Side Panel (Black) | 83419-THR-A01ZD | $30 - $60 |
| Console Box Assembly (Main Body) | 83428-THR-A11ZA | (Varies) |
Technical Specifications
OEM Part Numbers: 83416-THR-A11ZA 83419-THR-A01ZD 83420-THR-A01ZD 83427-THR-A21ZA 08U58-THR-100C 83428-THR-A11ZA
Equipped with Qi-standard wireless charging pad on Elite (US) and Touring (Canada) trims. Connects to the vehicle's MOST (Media Oriented Systems Transport) network.
We Have This Part in Stock



The information in this article is provided for general reference and educational purposes only. Vehicle specifications, procedures, and part compatibility can vary by production date, trim level, and region. Always consult your vehicle's factory service manual and verify part numbers before purchasing or performing repairs. Safety-critical components such as airbags, seat belts, and braking systems should be installed by a qualified professional.
- Honda Odyssey:
- 🛍️ Shop This Part
- Symptoms of a Failing Center Console
- 1. Wireless Phone Charger Stops Working or is Intermittent
- 2. Center Display and Audio Shut Down ('MOST Net Off' Error)
- 3. Dead USB or 12V Power Ports
- 4. Physical Damage
- Known Issues, Recalls, and Technical Service Bulletins (TSBs)
- Buying a Used 2021-2024 Odyssey Center Console
- What to Inspect on a Used Console
- Cost of Replacement
- Installation Overview
- Frequently Asked Questions (FAQ)
- Part Number Reference
- 🎟️ Get 5% Off