

2011-2018 Audi A6, A7, S6, S7 & RS7 Center Console: Fixing Peeling Buttons, Sticky MMI & Broken Latches
Your definitive guide to diagnosing and replacing the C7 platform center console, focusing on common wear items and what to inspect on a used unit.
- The most common failures are cosmetic or convenience-related, such as peeling buttons, a broken armrest latch, and sticky MMI controls from spills.
- Compatibility is critical when buying a used console. You must match the part number, trim material (e.g., carbon fiber), and whether the car has the full leather package.
- Many common issues can be repaired without replacing the whole console. Sticky buttons can be cleaned, peeling knob caps can be replaced, and broken latches are available as cheap standalone parts.
- A used OEM console is the most cost-effective solution for major damage like a cracked carbon fiber trim panel, saving thousands over a new part.
Symptoms of a Failing or Worn Center Console
Failures in the C7 platform center console are typically related to cosmetic wear and the breakdown of high-contact electronic components. Here are the most common issues owners of the Audi A6, A7, S6, S7, and RS7 encounter.
1. Peeling or Bubbling Buttons
The soft-touch rubberized or chrome coating on buttons, especially the main MMI control knob and volume knob, can bubble, peel, or wear away. This is a widespread cosmetic issue that makes the interior look dated. The exposed edges can sometimes be sharp. While individual buttons are not always sold separately, some owners have had success with aftermarket button decal repair kits or by carefully scraping off the remaining coating for a uniform black plastic finish.
2. Sticky or Unresponsive MMI Buttons
Due to the placement of the cupholders, spilled drinks are a frequent cause of sticky or non-functional MMI buttons. Sugar from soda or coffee can get into the switch mechanisms, preventing them from clicking or returning properly. In many cases, this can be fixed without disassembly by using an electronics-safe contact cleaner to dissolve the residue.
3. Erratic MMI Control Knob
The main MMI rotary knob (used for scrolling through menus) or the volume knob may behave erratically. For example, turning the volume up might cause it to jump down randomly. This is caused by dust and debris accumulating inside the rotary encoder, which is the sensor that reads the knob's movement. A temporary fix involves pulling the knob cap off and spraying contact cleaner into the mechanism, followed by compressed air to blow out the debris. If this doesn't provide a lasting solution, the MMI control unit may need to be replaced.
4. Broken Armrest Latch
The small plastic latch that secures the center armrest lid can become brittle and break, preventing the armrest from staying closed. This is a simple mechanical failure. Fortunately, affordable aftermarket replacement latches are widely available and are relatively easy to install.
5. Cracked or Scratched Trim
The decorative trim on the console, whether it's piano black, wood, or carbon fiber, is susceptible to scratches from daily use. The carbon fiber trim, found standard on RS7 models and optional on others, can also suffer from cracks in the resin or delamination of the clear coat, which is expensive to fix properly. Minor scratches can sometimes be polished out, but deep gouges or cracks in the trim panel require replacement of the entire trim piece.
6. Armrest Stuck in Upright Position
The armrest has a ratcheting hinge that allows it to be set at different heights. This mechanism can sometimes fail, causing the armrest to get stuck in the fully upright position. To reset it, you typically need to lift it all the way up before it will go back down. If it's truly stuck, the hinge mechanism may be broken internally, requiring disassembly or replacement of the armrest lid.
Warning: In some cases, the entire MMI button panel may lose power and the buttons will not light up. This can be a symptom of a faulty MMI control module or, in some cases, related to a known issue where the wiring for the main pop-up display breaks from repeated motion, causing electrical shorts. An MMI system reboot should be the first diagnostic step.
Known Issues, TSBs, and Recalls
While there are no specific recalls or Technical Service Bulletins (TSBs) for the center console assembly itself, several important safety recalls affect the 2011-2018 Audi A6, A7, S6, S7, and RS7 platform.
- NHTSA Recall 74D5 (Passenger Airbag Sensor): A critical recall was issued for a faulty Passenger Occupant Detection System (PODS) sensor in the front passenger seat. This sensor can fail, preventing the passenger airbag from deploying correctly in a crash. This affects a wide range of 2012-2018 models, and owners should ensure this free repair has been performed by a dealer.
- NHTSA Recall 24DP (Fuel Rail Leak): Certain 2016-2018 models were recalled for a fuel rail that could leak, increasing the risk of a fire. An earlier recall (18V061) also addressed potential fuel line leaks on 2012-2014 models.
Always check your vehicle's VIN on the NHTSA website to see if any open recalls apply.
Buying a Used Center Console: What to Inspect
A used OEM center console can be a cost-effective replacement for a badly damaged unit. Because this is a high-interaction part, a thorough inspection is crucial.
1. Verify Compatibility First
The most important step is to match the part number and features. Consoles vary based on:
- Trim Material: Carbon Fiber, Layered Wood, Piano Black, etc. This guide's specified part numbers are for a console with Carbon Fiber trim.
- Leather Package: The console mentioned (e.g., 4G0864208K4PK) is for vehicles without the full leather package. Consoles for cars with the full leather option have stitched leather on the vertical sides, which this version lacks.
- MMI Controller: Ensure the button layout matches your vehicle's options (e.g., MMI Touchpad).
2. Physical Inspection Checklist
- Buttons and Knobs: Press every single button. Do they click crisply or feel sticky? Check for peeling or excessive wear on the graphics.
- MMI Rotary Knobs: Turn the main control knob and the volume knob. Does the movement feel smooth, or does it feel gritty? Test the joystick and push-button functions.
- Armrest: Open and close the armrest. Test the latch to ensure it clicks securely. Lift the armrest through its height adjustments to check the ratchet mechanism. Inspect the armrest pad for rips, stains, or collapsed foam.
- Trim Condition: Carefully inspect the carbon fiber trim for deep scratches, cracks, or signs of the clear coat lifting (delamination).
- Mounting Points: Flip the console over and check all plastic mounting tabs and bolt holes. If any are cracked or broken, the console may not install securely and could lead to rattles.
- Wiring: Look at all visible wiring harnesses and connectors. Ensure there are no cut wires or damaged connector plugs.
Pro Tip: If only one or two components are broken (like the armrest latch or a sticky MMI knob), it's often much cheaper and easier to repair or replace just that specific part rather than the entire console assembly.
Cost Comparison for Center Console Replacement
Prices can vary significantly based on the specific trim and condition.
| Part Type | Estimated Cost | Notes |
|---|---|---|
| New OEM (Complete Assembly) | $1,500 - $2,500+ | Very expensive, especially with carbon fiber trim. The armrest base alone can be over $380. Must be ordered from a dealer. |
| Used OEM | $300 - $900 | Price depends heavily on condition and trim. A great value if you can find one in excellent shape. |
| New Aftermarket (Components) | $10 - $150 | Complete aftermarket consoles are not common. This price range is for individual parts like armrest latches, button decal kits, or vinyl wraps. |
| Shop Labor | $250 - $450 | Expect 2-3 hours of labor for a complete console swap at a professional shop. |
Replacement Overview & Difficulty
Replacing the entire center console is a moderately difficult job that is achievable for a patient DIYer. The process involves significant interior disassembly.
- Difficulty: 3 out of 5
- Estimated Time: 2-3 hours
- Tools Required: Plastic trim removal tools, socket set (8mm, 13mm), Torx drivers.
General Steps:
- Start in the back seat by prying off the rear climate control vent.
- Remove bolts located behind the vent and inside the armrest storage bin.
- Move to the front and remove the trim around the gear selector and the MMI control panel.
- Disconnect all electrical connectors for the MMI, shifter, parking brake, and other components. These have locking tabs that must be released carefully.
- Remove the final mounting bolts at the front and sides of the console.
- Lift the entire assembly up and out of the car, usually into the back seat.
One helpful tip is that the MMI controls and shifter can be reconnected without the main console body, allowing the car to be driven if you need to remove the console for repair (like wrapping the trim).
Frequently Asked Questions (FAQ)
Can I just replace the peeling MMI knob?
Yes. The cap for the main MMI control knob and the volume knob can be pulled straight up and off with firm pressure. Replacement caps are available online. This is a simple, push-on installation that does not require removing the console.
Will a center console from an Audi A6 fit my S7 or RS7?
Yes, physically it will fit, as they are all based on the same C7 platform. However, you MUST ensure the part numbers and all options (trim material, button layout, leather stitching) are identical to your original for it to be a direct, plug-and-play swap.
How do I fix a sticky MMI button from a spilled drink?
You can often fix this without disassembly. Use a can of QD Electronic Cleaner or similar contact cleaner safe for plastics. Spray a small amount around the affected button and press it repeatedly to work the cleaner in. Use a microfiber towel to wipe up any excess. The cleaner evaporates quickly and dissolves the sticky residue without damaging the electronics.
Is the carbon fiber trim on the RS7 real?
Yes, the factory carbon fiber trim is authentic and consists of real carbon fiber cloth sealed in an epoxy resin. This is why it is very expensive to replace compared to standard wood or aluminum trims. Cheaper alternatives include vinyl wraps that mimic the carbon fiber look.
Technical Specifications
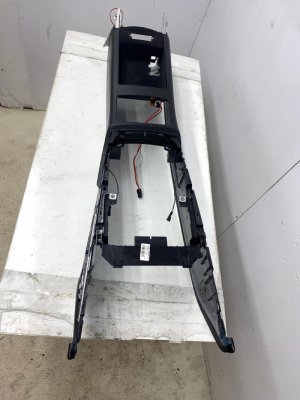
OEM Part Numbers: 4G08632446PS 4G0863244D 4G0863273 4G08632734PK 4G0864208H4PK 4G0864208K4PK 4G0864208G4PK
Assembly with Carbon Fiber trim, for vehicles NOT equipped with the full leather package.
We Have This Part in Stock




The information in this article is provided for general reference and educational purposes only. Vehicle specifications, procedures, and part compatibility can vary by production date, trim level, and region. Always consult your vehicle's factory service manual and verify part numbers before purchasing or performing repairs. Safety-critical components such as airbags, seat belts, and braking systems should be installed by a qualified professional.
- Audi A6:
- Audi S6:
- Audi RS7:
- Audi S7:
- Audi A7:
- Audi A7 Quattro:
- 🛍️ Shop This Part
- Symptoms of a Failing or Worn Center Console
- 1. Peeling or Bubbling Buttons
- 2. Sticky or Unresponsive MMI Buttons
- 3. Erratic MMI Control Knob
- 4. Broken Armrest Latch
- 5. Cracked or Scratched Trim
- 6. Armrest Stuck in Upright Position
- Known Issues, TSBs, and Recalls
- Buying a Used Center Console: What to Inspect
- 1. Verify Compatibility First
- 2. Physical Inspection Checklist
- Cost Comparison for Center Console Replacement
- Replacement Overview & Difficulty
- Frequently Asked Questions (FAQ)
- 🎟️ Get 5% Off