

2022-2025 Lucid Air Rear Bumper Bracket: Inspection, Replacement, and High Repair Costs
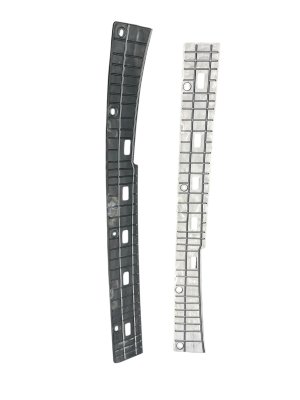
This guide details the inspection and replacement of the rear bumper impact absorber brackets, part number P11E270CL, for the Lucid Air, a critical component in the vehicle's crash safety system.
- This is a critical safety part; never reuse a bracket that has been in an accident, as unseen cracks can compromise its effectiveness.
- The OEM part number P11E270CL is for a set that includes both the left and right rear brackets.
- Replacement is difficult, requiring the complete removal of the rear bumper cover, which is held by several hidden Torx bolts and very strong clips.
- Due to the high cost of Lucid parts and labor, a verified-undamaged used OEM bracket is a safe and cost-effective alternative to new.
Symptoms of a Damaged Bracket
The Bumper Impact Absorber Bracket is a passive structural part, meaning it does not have mechanical or electrical functions that can fail over time. Damage is almost always the result of a physical impact, such as a parking lot bump or a rear-end collision.
- Visible Damage After an Accident: The most obvious sign is a cracked, bent, or shattered bracket. This is often only visible after the bumper cover has been removed for inspection.
- Loose or Misaligned Bumper Cover: If the brackets are broken, they can no longer properly support the bumper cover and the impact absorber behind it. This can cause the bumper cover to sag, stick out, or appear crooked.
- Rattling Noises: A broken piece of the bracket may rattle around inside the bumper assembly, especially when driving over bumps.
Warning: Never ignore bumper damage on a Lucid Air. The bumper assembly houses sensitive parking sensors and other ADAS (Advanced Driver-Assistance Systems) components. Misalignment can cause these systems to malfunction. Forum users report that Lucid-certified body shops often require full bumper replacement and sensor recalibration even for minor damage to ensure safety systems work correctly.
Buying a Used Bumper Impact Absorber Bracket
Given the extremely high cost of new OEM parts and repairs for the Lucid Air, a used OEM bracket is an excellent value-oriented choice. Since this is a simple structural component, a recycled bracket from an undamaged vehicle offers the same safety and fitment as a new part. Aftermarket versions for this specific part are generally not available for a vehicle as new and specialized as the Lucid Air.
Inspection Checklist for a Used Bracket:
- Verify the Part Number: The known OEM part number for the rear bracket set is P11E270CL. Confirm this matches the part you are replacing. This part number includes both the left and right side brackets.
- Check for Hairline Cracks: Carefully inspect the entire part, especially around the mounting holes and corners. Even a minor impact can create small stress cracks that compromise the part's integrity in a future collision. Flex the part slightly in your hands to reveal any hidden cracks.
- Ensure it is Straight and True: Lay the bracket on a perfectly flat surface. It should sit flush with no wobbling or gaps. Any warping or bending indicates it has been compromised in an accident and should not be used.
- Inspect All Mounting Points: Check that all screw holes, tabs, and clip receivers are intact and not broken, stripped, or elongated. Damage here will prevent a secure installation.
- Ask About the Source Vehicle: Whenever possible, purchase from a recycler who can confirm the part came from a vehicle that did not sustain a rear-end collision. A part from a car with front-end or side damage is perfectly acceptable.
Known Issues, Recalls, and Service Bulletins
As of mid-2026, there are no specific recalls or Technical Service Bulletins (TSBs) from the NHTSA or Lucid Motors related to the rear bumper impact absorber brackets for the 2022-2025 Lucid Air. While recalls exist for software, wiring, and other components, the bumper structure itself has not been the subject of a recall.
Cost of Replacement
Repair costs for the Lucid Air are notably high, primarily due to expensive parts and the limited number of certified repair facilities.
| Part/Service | Estimated Cost |
|---|---|
| New OEM Bracket Set (P11E270CL) | Contact Dealer (Expect $150 - $300+) |
| New Aftermarket | Not Available |
| Used OEM Bracket Set | $75 - $150 |
| Shop Labor (Bumper R&R) | $375 - $875 |
Cost estimates are for the brackets only and do not include the bumper cover, paint, impact absorber, or sensor recalibration, which can add thousands of dollars to the repair.
Installation and Replacement Guide
Replacing the bumper impact absorber brackets requires the complete removal of the rear bumper cover. Based on technician videos, this process is complex due to hidden fasteners and very strong retaining clips.
Installation Difficulty: 4 out of 5 (Difficult)
Estimated Time: 2.5 - 3.5 hours
Tools Required:
- Trim removal tool kit
- Torx bit set
- Socket set
- A soft blanket or mat to place the bumper on
Step-by-Step Bumper Removal:
- Open Trunk: Locate and remove the Torx bolts in the upper corners of the bumper that are visible when the trunk is open.
- Remove Fender Well Fasteners: In each rear wheel well, remove the shield or liner to access a hidden Torx bolt securing the side of the bumper.
- Remove Underbody Fasteners: Remove all Torx bolts along the bottom edge of the bumper cover.
- Remove Trim Molding: This is a critical step. A long, thin trim molding piece runs along the side of the bumper. It must be carefully pried off to reveal another hidden Torx bolt underneath. This molding is reportedly flimsy, so use caution.
- Disconnect Sensors: Before pulling the bumper away, carefully reach behind it and disconnect all electrical harnesses for parking sensors, lights, and any other features. Failure to do this will damage the wiring.
- Release Main Brackets: The bumper is held on by very strong clips on the main side brackets. This is the most difficult part of the removal. You must pull the bumper straight back with significant, steady force to pop it free from these clips.
- Remove Bumper: Once free, place the bumper cover face-up on a soft blanket to prevent scratches.
- Replace Brackets: With the bumper cover removed, the impact absorber and its brackets will be exposed. Unbolt the old brackets from the main reinforcement beam and install the new ones.
- Reassembly: Installation is the reverse of removal. Ensure all sensors are reconnected and test them before fully seating the bumper.
Pro Tip: The main side brackets that hold the bumper cover are extremely tight. A video from a technician shows that a very hard, sharp pull backward is required to release the bumper. Do not wiggle it side-to-side; apply force directly rearward.
Frequently Asked Questions (FAQ)
Does part number P11E270CL include both left and right brackets?
Yes, based on available data, P11E270CL is sold as a set containing both the driver and passenger side rear impact absorber brackets.
Can I reuse my old bracket after a minor accident?
No. It is strongly recommended to replace the bracket after any impact. The plastic can develop micro-cracks that are not visible to the naked eye but will compromise its ability to absorb energy in a future collision.
Do I need to paint a new bumper bracket?
No. This is a structural component that is completely hidden behind the bumper cover. It does not require painting or color matching.
Why are Lucid Air bumper repairs so expensive?
Repairs are costly due to several factors: the high price of OEM parts, the aluminum-intensive construction of the vehicle, and the necessity of using Lucid-certified body shops that have the specific training and tools. Furthermore, any repair involving the bumper often requires expensive recalibration of the integrated ADAS sensors.
Technical Specifications
OEM Part Numbers: P11E270CL
Material: Automotive-grade structural plastic or composite. Includes left and right side brackets.
We Have This Part in Stock

The information in this article is provided for general reference and educational purposes only. Vehicle specifications, procedures, and part compatibility can vary by production date, trim level, and region. Always consult your vehicle's factory service manual and verify part numbers before purchasing or performing repairs. Safety-critical components such as airbags, seat belts, and braking systems should be installed by a qualified professional.
- Lucid Air:
- 🛍️ Shop This Part
- Symptoms of a Damaged Bracket
- Buying a Used Bumper Impact Absorber Bracket
- Inspection Checklist for a Used Bracket:
- Known Issues, Recalls, and Service Bulletins
- Cost of Replacement
- Installation and Replacement Guide
- Step-by-Step Bumper Removal:
- Frequently Asked Questions (FAQ)
- 🎟️ Get 5% Off