

2009-2014 Nissan Maxima Rear Bumper Cover: Fitment, Sensors, and Replacement
This guide covers the key details for replacing the rear bumper cover on a 7th generation Nissan Maxima, focusing on parking sensor compatibility and avoiding common issues.
- The most critical factor when buying a replacement is checking for parking sensor compatibility; OEM covers do not come pre-drilled.
- A used OEM bumper cover generally provides better fit and quality than a new aftermarket one, but inspect all mounting tabs carefully before purchase.
- All replacement bumper covers, new or used, will require professional painting to match your vehicle's color, which is a significant part of the total cost.
- Replacement is a DIY-friendly job for those with basic tools, but aftermarket parts may require extra effort to align correctly.
Symptoms of a Damaged Rear Bumper Cover

Damage to a rear bumper cover is almost always visible. Since it's a cosmetic part, failure symptoms are straightforward and don't typically cause drivability issues unless the damage is severe.
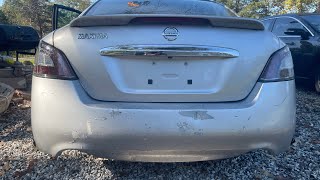
- Cracks, Scuffs, and Punctures: The most common symptom is visible damage from a minor collision or impact. This can range from light scratches in the paint to deep gouges, cracks, or holes in the plastic.
- Sagging or Poor Fit: If the mounting tabs or clips break, the bumper cover can sag, droop, or have a noticeable gap where it meets the quarter panels or taillights. This can cause rattling noises over bumps.
- Parking Sensor Malfunctions: For models equipped with parking assist, damage to the bumper cover can push a sensor out of alignment, causing it to malfunction. This may result in a persistent warning tone or an error message on the dash. 🎬 Watch this video on why parking sensors fail and how to fix them. Sometimes, a simple cleaning of the sensor surface can resolve issues 🎬 See how to fix parking sensor issues for free., but physical damage to the cover often requires sensor replacement or remounting.
Known Issues, Recalls, and TSBs

For the 2009-2014 Nissan Maxima, there are no specific recalls or widespread Technical Service Bulletins (TSBs) directly related to the rear bumper cover itself. Most issues are related to general wear, collision damage, or problems with integrated components.
- Parking Sensor Compatibility: The most significant issue when replacing this part is ensuring compatibility with the vehicle's options. Bumper covers for models with rear parking sensors have precise holes for the sensors to mount. A cover from a base model will not have these holes. While it is possible to drill holes in a non-sensor cover, it requires exact placement to ensure the sensors function correctly.
- Aftermarket Fitment Problems: Aftermarket bumper covers are known for having fitment issues. They may not align perfectly with the body lines, taillights, or mounting points, leading to gaps or a wavy appearance. They are often made from a different grade of plastic that can be more brittle than the original equipment manufacturer (OEM) part.
Warning: The OEM part number 85022-9N00H fits all 2009-2014 Maxima trims (S, SV) but comes as a single version without pre-drilled sensor holes. If your vehicle has parking sensors, the holes must be carefully drilled by the body shop during preparation and painting.
Buying a Used 2009-2014 Maxima Rear Bumper Cover

A used OEM bumper cover is often the best choice, offering superior fit and durability compared to a new aftermarket part. However, careful inspection is crucial before buying.
What to Check Before You Buy:
- All Mounting Tabs Intact: The most critical inspection point. Check every tab and clip location around the perimeter of the cover, especially where it attaches under the taillights and to the quarter panels. Even one broken tab can cause sagging or a poor fit that's difficult to correct.
- Look for Hidden Repairs: Inspect the backside of the bumper cover for signs of previous repairs. Look for fiberglass patches, body filler (Bondo), or excessive sanding marks. These repairs can crack or fail over time, especially after painting.
- Surface Condition: A used cover will have cosmetic flaws like scratches and scuffs, which is normal. The key is to ensure there are no deep gouges or cracks that go all the way through the plastic. A body shop can easily sand and prime a scuffed surface, but repairing cracks is much more labor-intensive.
- Confirm OEM Markings: Look for a Nissan logo or factory part number molded into the plastic on the inside of the cover to ensure you are getting a genuine OEM part.
Pro Tip: Don't worry about the color of the used bumper cover. All replacement covers, whether new or used, will need to be professionally sanded, primed, and painted to match your specific vehicle's paint code.
Cost Comparison for a 2009-2014 Maxima Rear Bumper Cover
Prices can vary based on location and supplier. The costs below are estimates to help you understand the value of different options. Painting and installation are significant additional costs.
| Part Type | Estimated Cost (Part Only) | Notes |
|---|---|---|
| New OEM | $430 - $530 | Genuine Nissan part, comes primed and unpainted. Perfect fit guaranteed. |
| New Aftermarket | $230 - $300 | May have fitment issues. Often shipped folded, requiring time to regain its shape. |
| Used OEM | $250 - $400 | Best value for OEM quality and fit. Condition varies. |
| Shop Labor (Installation) | $150 - $400 | Cost for removing the old cover and installing the new one. |
| Shop Labor (Painting) | $300 - $800 | Includes prep, color-matching, painting, and clear coat. Metallic or pearl colors may cost more. |
Replacement Overview

Replacing the rear bumper cover on a 7th generation Maxima is a manageable DIY project for someone with basic tools and patience. A video guide can be very helpful for visualizing the process.
🎬 Watch a full video guide on 2009-2014 Maxima rear bumper replacement.- Difficulty: 2.5 out of 5
- Tools Needed: Socket set (8mm, 10mm), plastic trim removal tools, flathead screwdriver, Phillips screwdriver.
- General Steps:
- Open the trunk and remove the trunk floor covering and sill plate to access fasteners.
- Remove the tail light assemblies. There are typically fasteners inside the trunk holding them in place.
- Remove screws and plastic clips from inside each rear wheel well.
- Remove clips and fasteners along the bottom edge of the bumper cover.
- If equipped, disconnect the wiring harness for the parking sensors and license plate lights.
- Carefully pull the sides of the bumper cover away from the quarter panels to release the retaining clips. It's best to start at the wheel well and pull outwards.
- With the sides free, pull the bumper cover straight back to remove it from the vehicle.
Frequently Asked Questions (FAQ)
Do I need to paint a replacement bumper cover?
Yes. New OEM covers come in a black primer finish, and aftermarket covers are also unpainted. Used covers will be the color of the donor car. For a proper match, the cover must be professionally painted using your vehicle's specific paint code.
What is the difference between a bumper cover and a bumper reinforcement?
The bumper cover (or fascia) is the outer plastic piece you see. The bumper reinforcement is the heavy steel or aluminum bar mounted behind it, which is the primary structural and safety component. The cover is cosmetic, while the reinforcement absorbs impact energy in a collision.
Can I reuse my old parking sensors?
Yes, as long as they were not damaged in the impact. The sensors can be unclipped from the old bumper cover and transferred to the new one. Be careful not to damage the clips or wiring during removal.
My aftermarket bumper was shipped folded. What do I do?
This is a common practice to save on shipping costs. Unpack the bumper immediately and let it sit in a warm room or direct sunlight for several hours. The heat will help the plastic return to its original, unfolded shape. A heat gun on a low setting can be used carefully to speed up the process.
Helpful Videos
Technical Specifications
OEM Part Numbers: 85022-9N00H 850229N00H
Material: Plastic. Finish: Primed/Unpainted.

The information in this article is provided for general reference and educational purposes only. Vehicle specifications, procedures, and part compatibility can vary by production date, trim level, and region. Always consult your vehicle's factory service manual and verify part numbers before purchasing or performing repairs. Safety-critical components such as airbags, seat belts, and braking systems should be installed by a qualified professional.
- Nissan Maxima: