

2011-2018 Bentley Continental Bumper Bracket Guide: Alignment, Fitment, and Replacement
This guide details how to identify failed bumper brackets on your Continental GT or GTC, what to look for in a used set, and how to ensure perfect bumper alignment.
- Fitment is exclusive to 2011-2018 Continental GT (Coupe) and GTC (Convertible) models; they do NOT fit the Flying Spur sedan.
- Primary failure symptoms are visual, such as a sagging bumper and uneven panel gaps, or audible rattles from the bumper area.
- When buying used OEM brackets, inspect them carefully for any cracks, especially around mounting holes, and signs of previous repairs.
- Replacement is a moderately difficult DIY job that requires the complete removal of the bumper cover and potentially a special 8mm wrench for bolts near the headlights.
Key Compatibility Warning: GT/GTC Models Only
Warning: This bumper bracket set is specifically for the 2011-2018 Bentley Continental GT (Coupe) and GTC (Convertible) models. These brackets will not fit the Bentley Flying Spur sedan of the same era, which uses a different bumper and mounting system. Always verify the model of the donor vehicle before purchasing a used set.
Symptoms of Failing Bumper Brackets
Failure of a bumper bracket is almost always the result of a minor impact, parking block collision, or material fatigue over time. The symptoms are primarily visual and audible.
- Poor Bumper Alignment: This is the most common sign. Look for a sagging bumper, or uneven gaps between the bumper cover and the fenders, grille, or headlights. One side might appear lower than the other.
- Rattling or Vibrating Noises: A broken or loose bracket will allow the bumper cover to vibrate against the car's body or other components. This noise is often most noticeable when driving over bumps or on rough roads.
- Loose Bumper Cover: If you can physically move or wiggle a corner of the bumper cover with your hand, it's a strong indication that the underlying bracket is broken or its fasteners are missing.
- Parking Sensor Errors: While the bracket itself has no electronics, a significant sag in the bumper can change the angle of a parking sensor. This can cause the park-assist system to malfunction or give false readings.
Pro Tip: Many owners discover broken brackets or missing bolts during unrelated repairs. This suggests that damage from previous owners or improper installation by body shops is common. If your bumper has ever been repaired or repainted, a thorough inspection of the brackets is recommended.
Buying a Used 2011-2018 Continental Bumper Bracket Set
Given the high cost of new OEM parts, a used OEM bracket set is an excellent value. However, careful inspection is crucial to ensure you're getting a solid, usable part. Aftermarket brackets for this specific application are not common and are generally not recommended due to potential fitment issues on a vehicle where panel gaps are critical.
What to Inspect
- Check for Cracks: Pay close attention to the mounting holes and corners. These are high-stress areas. Hairline cracks can quickly worsen once installed.
- Look for Stress Marks: On plastic brackets, look for white or discolored lines. This indicates the plastic has been bent or stressed and is weakened.
- Verify Flatness: Place the bracket on a flat surface. It should sit flush without any significant warping or twisting, which can result from impact or heat damage.
- Avoid Repaired Brackets: Pass on any brackets that show signs of glue, epoxy, or plastic welding. These repairs are rarely as strong as the original material and are likely to fail.
- Confirm Part Numbers: If possible, match the part numbers from your old brackets to the used ones. There are different brackets for the front, rear, left, and right sides.
Known Issues, TSBs, and Recalls
As of mid-2026, there are no specific recalls or Technical Service Bulletins (TSBs) issued by Bentley or the NHTSA for the bumper brackets on 2011-2018 Continental models. Failures are typically isolated incidents caused by physical damage rather than a widespread manufacturing defect.
Cost Comparison for Bumper Bracket Replacement
The main costs involve the parts themselves and the labor to remove and reinstall the bumper cover. Prices for brackets are often per-piece, and a full set consists of multiple components for the front or rear.
| Part/Service | Estimated Cost |
|---|---|
| New OEM Bracket (Single) | $150 - $250 |
| Used OEM Bracket (Single) | $75 - $125 |
| New Aftermarket Bracket | Not commonly available |
| Shop Labor for Replacement | $300 - $750 |
Labor costs are estimated based on 2-3 hours of work at a typical independent shop rate. Bentley specialist labor rates may be higher.
Installation and Replacement Guide
Replacing the bumper brackets requires the complete removal of the bumper cover. This is a moderately difficult job best suited for an experienced DIYer or a professional.
- Difficulty: 3 out of 5
- Estimated Time: 2-4 hours
- Tools Required: Plastic trim removal tools, Torx bit set (T-25, T-30), 8mm and 10mm sockets/wrenches, a special or modified 8mm wrench for a bolt near the headlights.
Step-by-Step Overview (Front Bumper)
- Preparation: It is recommended to disconnect the battery. Turn the front wheels to one side to gain access to the wheel well.
- Wheel Well Fasteners: Remove the T-25 Torx screws that secure the fender liner to the bumper cover.
- Undertray Fasteners: Remove the screws connecting the bumper cover to the engine undertray.
- Headlight Washer Jets: Carefully pry the washer jet cover out, pull the nozzle forward, and release the cover. Let the nozzle retract back into the bumper.
- Top Fasteners: Open the hood and remove the series of T-30 Torx bolts along the top edge of the bumper and grille area.
- Hidden Fasteners: This is the trickiest step. There are 8mm bolts located deep behind the bumper near the inner edge of the headlights that must be loosened or removed. A special thin, angled wrench is often required. Many DIYers find these bolts missing from previous improper repairs.
- Disconnect Electronics: With a helper, carefully pull the bumper cover away from the car. Do not pull it completely off. Reach behind and disconnect the wiring harnesses for the parking sensors and any other electronics like fog lights or radar sensors.
- Remove Bumper: With all fasteners and electronics disconnected, remove the bumper cover with your helper and place it on a soft blanket to prevent scratches.
- Replace Brackets: The brackets will now be visible, attached to the car's frame and/or the bumper cover itself. Unbolt the old brackets and install the new ones.
- Reassembly: Follow the steps in reverse order. It's a good idea to loosely fit all bolts first to ensure proper alignment before tightening them down completely.
Frequently Asked Questions (FAQ)
Do I need to replace all the brackets at once?
Not necessarily. If only one bracket is broken from a minor impact, you can replace just that one. However, if the bumper is sagging or the brackets appear old and brittle, it's often wise to replace them as a set (left and right) to ensure even fit and longevity.
Will a broken bumper bracket cause a dashboard warning light?
A broken bracket itself will not trigger a warning light. However, if the resulting bumper sag causes a parking sensor to be misaligned or its wiring to become damaged, you may get an error message related to the parking assist system.
Can I repair a cracked plastic bumper bracket?
While plastic repair is possible, it is generally not recommended for a structural component like a bumper bracket. A repaired bracket may not hold the precise alignment needed for a Bentley and is likely to fail again under stress. Given the availability of used OEM parts, replacement is a more reliable option.
Does this bracket set fit a Bentley Flying Spur?
No. The bumper brackets for the Continental GT and GTC are unique to those two models. The Flying Spur sedan has a different body and requires its own specific set of brackets.
Technical Specifications
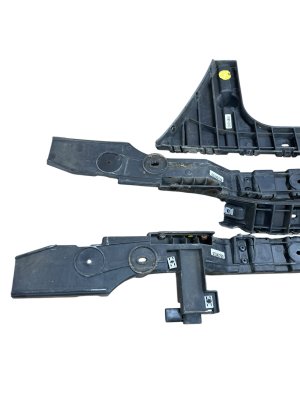
OEM Part Numbers: Front Right: 3W3807184A, 3W3807184AB Front Left: 3W3807183C Rear Left: 3W3807393, 3W3807393F Rear Right: 3W3807394F, 3W3807864
Material: Primarily high-impact plastic. Set includes multiple distinct pieces for front or rear, left and right sides.
We Have This Part in Stock

The information in this article is provided for general reference and educational purposes only. Vehicle specifications, procedures, and part compatibility can vary by production date, trim level, and region. Always consult your vehicle's factory service manual and verify part numbers before purchasing or performing repairs. Safety-critical components such as airbags, seat belts, and braking systems should be installed by a qualified professional.
- Bentley Continental:
- 🛍️ Shop This Part
- Key Compatibility Warning: GT/GTC Models Only
- Symptoms of Failing Bumper Brackets
- Buying a Used 2011-2018 Continental Bumper Bracket Set
- What to Inspect
- Known Issues, TSBs, and Recalls
- Cost Comparison for Bumper Bracket Replacement
- Installation and Replacement Guide
- Step-by-Step Overview (Front Bumper)
- Frequently Asked Questions (FAQ)
- 🎟️ Get 5% Off