

2017-2023 Tesla Model 3 Rear Audio Amplifier: Diagnosing Silence & Voice Command Failure
This guide covers the common failure of the external amplifier in Premium Audio systems, which causes loss of sound from the rear speakers, subwoofer, and microphone.
- This external amplifier is only found in Model 3s with the Premium Audio system (Long Range and Performance trims). Base models do not have this part.
- A failed rear amplifier will knock out the subwoofer, rear speakers, and front door woofers. Crucially, it will also disable the microphone for voice commands.
- Tesla Service Centers will not program a used amplifier. Buying a used unit is a risk, as it may not be fully plug-and-play without special software configuration.
- Before any complex diagnosis, perform a soft reset by holding both steering wheel scroll wheels, as this fixes many common audio glitches.
Understanding the Model 3 Audio Systems: Standard vs. Premium
Before diagnosing any audio issue, you must first identify which sound system your 2017-2023 Model 3 has. The external rear amplifier is only present in vehicles with the Premium Audio system. Base models do not have this part, and their audio issues will have different causes. You can check your car's configuration on the touchscreen under 'Software' > 'Additional Vehicle Information'.
| Feature | Standard / Standard Range Plus Audio | Premium Audio (Long Range / Performance) |
|---|---|---|
| Speakers | 7-9 speakers, depending on year. | 14-17 speakers, depending on year. |
| Amplifiers | 1 (integrated into the main computer). | 2 (integrated front amp + separate rear external amp). |
| Subwoofer | No. | Yes, one or two in the trunk. |
| This Part | Not Equipped | Equipped |
Is it the Amplifier, the Tuner, or the Main Computer?
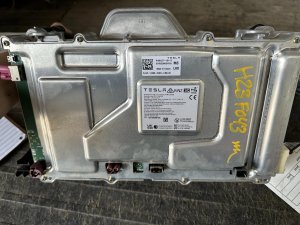
There can be confusion about which audio component has failed. The part number 1079749-00-E, sometimes referred to as an 'Audio Control Module', is actually the FM/DAB Radio Tuner Module. While a tuner failure can cause loss of radio reception, it will not cause a complete loss of sound from sources like Bluetooth or USB. The symptoms described in this article—loss of rear speakers, subwoofer, and microphone—point specifically to the External Audio Amplifier (part number often 1079748-00-E), which is the focus of this guide.
Common Symptoms of a Failing Rear Amplifier
When the rear amplifier fails, you won't lose all sound. The front dashboard speakers, powered by the main computer, will typically continue to work. This can sometimes make the problem confusing to diagnose.
- No sound from rear speakers: The rear door and rear parcel shelf speakers will be silent.
- No bass or subwoofer output: The most noticeable symptom is a complete lack of bass, as the subwoofer is powered exclusively by this amplifier. The 'Subwoofer' slider may disappear from the audio EQ settings on the touchscreen.
- Voice commands do not work: The vehicle's microphone system is routed through the rear amplifier. If the amp fails, you will not be able to use voice commands for navigation, music, or other functions. The car will not register your voice.
- No sound from front door woofers: While the dash speakers work, the larger woofers in the bottom of the front doors may also go silent.
- Intermittent audio cutouts: Before complete failure, the amplifier may cause audio to cut in and out from the speakers it powers.
How to Diagnose Rear Amplifier Failure
Pro Tip: Before assuming a hardware failure, always perform a soft reset of the infotainment system. Press and hold both scroll wheels on the steering wheel until the center screen turns off and then reboots. This simple step fixes many software-related audio glitches.
- Confirm Your Audio Package: Ensure your vehicle has the Premium Audio system. If it doesn't, you do not have a rear amplifier.
- Perform a Soft Reset: As mentioned above, hold both scroll wheels to reboot the system. Check for audio restoration.
- Perform a Hard Reset: If a soft reset fails, a full vehicle power cycle may help. This involves disconnecting the 12V battery and the high-voltage disconnect. This is a more advanced step and should be done by following Tesla's official procedures carefully.
- Check Audio Balance and Fader: Ensure the audio settings haven't been accidentally moved all the way to the front.
- Isolate the Speakers: Play a song with distinct bass and use the on-screen balance and fader controls. Confirm that sound is only coming from the front dashboard tweeters and mid-range speakers, with no output from the rear or subwoofer.
- Test Voice Commands: Press the right scroll wheel to activate voice commands. If the system does not respond or show any input, it strongly suggests a rear amplifier failure.
- Check Service Mode: Enter Service Mode on the touchscreen (press and hold 'Model 3' logo, then type 'service'). Check for any alerts related to the audio system or amplifier. Note that a failed amp may not always post an alert.
Buying a Used Model 3 Rear Amplifier
Given the high cost of new Tesla parts, a used OEM amplifier is a popular choice. However, there are critical factors to consider.
Warning: Tesla Service Centers will typically refuse to install or program a used electronic module purchased from a third party. You will likely need to perform the installation yourself or find an independent repair shop that is willing to work with used Tesla components.
- Compatibility is Key: You MUST buy an amplifier from a vehicle with the same Premium Audio system. Ensure the part number (e.g., 1079748-00-E) matches what is required for your vehicle's year and configuration.
- Programming Requirements: This is the biggest challenge. Unlike simple mechanical parts, this module is part of the car's software-defined network. While some sources suggest it may be plug-and-play, others indicate it may require coding or programming to the vehicle. There is a significant risk that a used module may not be fully functional without software configuration that is difficult to perform outside of the Tesla ecosystem.
- Physical Inspection: When buying a used unit, inspect the case for any signs of water damage, which is a common cause of failure for electronics mounted in the trunk. Check that all connector pins are straight and free of corrosion.
- Why Used OEM is the Only Option: Currently, there are no direct aftermarket replacements for the OEM rear amplifier. Aftermarket options are typically 'upgrade' kits that add a different amplifier and require wiring modifications. For a direct, bolt-in repair, a used OEM unit is the only cost-effective choice.
Replacement Overview
Replacing the rear amplifier is feasible for a DIYer with basic tools. The official Tesla service procedure quotes a short time for the job (0.25-0.40 hours).
- Disconnect 12V Power: This is a critical safety step before working on any electronics.
- Access the Amplifier: The amplifier is located in the trunk on the right-hand (passenger) side, behind the carpeted trim liner.
- Remove Trim: You will need to remove the trunk load floor, sill trim, and pull back the side liner to access the component.
- Disconnect and Unbolt: The amplifier has three electrical connectors. It is held to the body or the subwoofer enclosure with a few nuts and bolts (typically 10mm socket and Torx T30).
- Installation: Installation is the reverse of removal. Reconnect the 12V battery last.
Frequently Asked Questions
Does a replacement Tesla Model 3 audio amplifier need to be programmed?
It might. This is a major point of uncertainty. Tesla's system is tightly integrated, and a replacement module may require software configuration to work with the vehicle. Critically, Tesla Service will not program a used part, so you are taking a risk that it may not be fully plug-and-play.
Why did my microphone and voice commands stop working when my audio failed?
In the Model 3 with Premium Audio, the microphone circuit is routed through the rear external amplifier. When the amplifier fails, it breaks that connection, disabling voice commands.
Where is the rear audio amplifier located in a Model 3?
It is located in the trunk, behind the carpeted trim panel on the right-hand (passenger) side. It is often mounted directly to the subwoofer enclosure.
Will a soft reset fix my audio problem?
It might, and it's always the first thing you should try. Many audio issues, like a frozen display or no sound after an update, are temporary software glitches that can be resolved by rebooting the infotainment system by holding down both steering wheel scroll wheels.
Technical Specifications
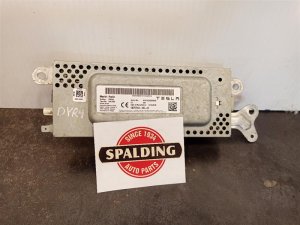
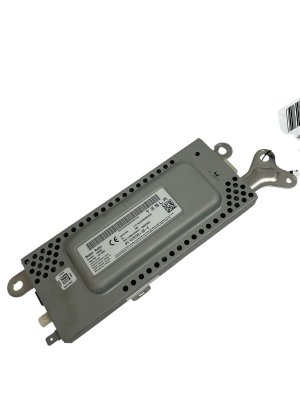
OEM Part Numbers: 1079748-00-E 1079749-00-E (This is the Radio Tuner, not the amplifier)
Powers the subwoofer, rear speakers, and front door woofers in the Premium Audio system. Integrates the vehicle's microphone circuit.
We Have This Part in Stock

The information in this article is provided for general reference and educational purposes only. Vehicle specifications, procedures, and part compatibility can vary by production date, trim level, and region. Always consult your vehicle's factory service manual and verify part numbers before purchasing or performing repairs. Safety-critical components such as airbags, seat belts, and braking systems should be installed by a qualified professional.
- Tesla 3:
- 🛍️ Shop This Part
- Understanding the Model 3 Audio Systems: Standard vs. Premium
- Is it the Amplifier, the Tuner, or the Main Computer?
- Common Symptoms of a Failing Rear Amplifier
- How to Diagnose Rear Amplifier Failure
- Buying a Used Model 3 Rear Amplifier
- Replacement Overview
- Frequently Asked Questions
- 🎟️ Get 5% Off