

1994-2004 Discovery A/C Evaporator: A Guide to Leaks, Smells, and Dash Removal
This guide covers the common failure symptoms, complex replacement process, and critical compatibility differences for the A/C evaporator core in the Land Rover Discovery I and Discovery II.
- Evaporator replacement is an expert-level job requiring complete removal of the dashboard, taking 8-12 hours of labor.
- It is critical to identify your vehicle as a Discovery I (1994-1999 SD) or Discovery II (1999-2004) as the parts are not interchangeable.
- Common failure symptoms include weak/warm A/C, a musty smell from mold growth, or a sweet smell from a refrigerant leak.
- When replacing the evaporator, you must also replace the A/C receiver/drier and expansion valve to ensure system longevity.
Critical Compatibility: Discovery I vs. Discovery II

The 1994-2004 model year range for the Land Rover Discovery spans two distinct generations, and they do not use the same A/C components. Understanding which model you have is the first and most important step.
- Discovery I (D1): Produced from 1994 to 1999. For the 1999 model year, this body style was sold as the Discovery SD. These models have VINs that typically begin with 'SALJY'.
- Discovery II (D2): Produced from 1999 to 2004. These models have a longer rear overhang and different styling. VINs for these models often start with 'SALTY'.
Warning: The 1999 model year is a split year. You must verify if your 1999 Discovery is a Discovery I (SD) or the newer Discovery II. Parts are not interchangeable between these two generations.
Symptoms of a Failing A/C Evaporator Core

A failing evaporator core can present several distinct symptoms. Because it is buried deep within the dashboard, confirming it is the source of the problem is key before beginning this difficult repair.
1. Weak or Warm Air from Vents
The most common symptom is a significant loss of cooling performance. If the refrigerant has leaked out of the evaporator, the system cannot get cold. The air from the vents may be only slightly cool or completely warm. This can be mistaken for other issues like a bad compressor or low refrigerant from a leak elsewhere, so proper diagnosis is essential.
2. Musty or Sweet Smell
A persistent musty, mildew-like smell coming from the vents when the A/C is on is a strong indicator of a problem. This is caused by mold and bacteria growing on the evaporator core, often because the drain tube is clogged and moisture cannot escape. In some cases, a sweet smell may be present, which could indicate a refrigerant leak. Some owners describe the smell as being similar to "sweaty gym socks."
3. Visible Refrigerant Leak Inside the Cabin
An evaporator leak will release refrigerant gas and oil into the HVAC housing. This oily residue may find its way to the passenger-side footwell carpet. You might also notice a fine, fog-like mist coming from the vents, which is atomized refrigerant oil.
4. A/C Compressor Clutch Cycles Rapidly or Not at All
The A/C system has pressure switches that protect the compressor. If enough refrigerant has leaked out, the pressure will be too low, and the switch will prevent the compressor clutch from engaging to avoid damage. Conversely, if the system is partially charged, the compressor might cycle on and off rapidly.
Known Issues, TSBs, and Recalls
While no specific recalls exist for the A/C evaporator on the 1994-2004 Discovery, Land Rover has issued Technical Service Bulletins (TSBs) for similar issues on other models. For example, TSB LTB01120NAS2 was issued for later model Discovery Sport and Evoque vehicles due to evaporator corrosion causing leaks. This indicates a history of potential issues with evaporator materials and design. Forum discussions among owners confirm that evaporator leaks are a known, albeit difficult-to-fix, problem on both Discovery I and II models.
Diagnosis and Confirmation
Before condemning the evaporator, a technician should perform a thorough A/C system diagnosis.
- Check System Pressure: Connect a manifold gauge set to the high and low-side service ports. Low static pressure indicates a refrigerant leak.
- Introduce UV Dye: If a leak is suspected, a UV-sensitive dye can be injected into the system. After running the A/C, a black light can be used to find the source of the leak. If no leaks are visible in the engine bay (compressor, condenser, lines), the leak is likely at the evaporator.
- Use an Electronic Leak Detector: A sensitive electronic "sniffer" can be inserted into the vents and near the evaporator drain tube. If it detects refrigerant, the evaporator is leaking.
- Check the Drain Tube: Ensure the evaporator drain tube, which exits through the vehicle's firewall/floor, is clear. A clogged tube causes water to back up, leading to musty smells and potential water leaks into the cabin.
Pro Tip: A common leak point on the Discovery II is the A/C lines where they are clamped to the body on the driver's side of the radiator. Always check for oily residue here before assuming the evaporator is the culprit.
Buying a Used A/C Evaporator Core
Given the high cost of a new OEM part and the intensive labor involved, a quality used OEM evaporator from a low-mileage vehicle can be a smart choice. However, careful inspection is critical.
- Verify Compatibility: Double-check that the part is from the correct generation (Discovery I or II) and for the correct system (front or rear A/C, if equipped). Cross-reference OEM part numbers like AWR3014 for the Discovery I.
- Physical Inspection: Look for any signs of physical damage, such as bent fins or cracked fittings. Pay close attention to the inlet and outlet pipes; check for corrosion or signs of previous leaks (oily residue).
- Source Vehicle Information: If possible, get the mileage and history of the donor vehicle. A part from a lower-mileage vehicle that was not in a front-end collision is always preferable.
- Why Used OEM?: Original Equipment Manufacturer (OEM) evaporators are often built to higher standards than some aftermarket alternatives. The quality of the aluminum and the brazing on the joints can lead to a longer service life. A cheap aftermarket evaporator might save money upfront but could fail prematurely, forcing you to repeat the entire dash-removal process. 🎬 Watch this Land Rover evaporator coil replacement walkthrough
Replacement Overview & Difficulty

Replacing the A/C evaporator core is one of the most labor-intensive repairs on any vehicle. It is not recommended for DIY mechanics without significant experience.
- Difficulty Rating: 5 out of 5 (Expert Level)
- Core Task: The entire dashboard assembly must be removed to access the HVAC (Heating, Ventilation, and Air Conditioning) box that contains the evaporator. 🎬 See this step-by-step dashboard removal video
- System Evacuation: The A/C system must be professionally evacuated of all refrigerant before any lines are disconnected. It must be recharged after the repair is complete.
- Associated Parts: It is mandatory to replace the A/C receiver/drier and the expansion valve whenever the system is opened. All O-rings on the disconnected lines must also be replaced to ensure a proper seal.
Cost Breakdown
The cost of this repair is dominated by labor due to its complexity.
| Part/Service | Estimated Cost |
|---|---|
| New OEM Evaporator | $450 - $970 |
| New Aftermarket Evaporator | $80 - $200 |
| Used OEM Evaporator | $50 - $150 |
| Shop Labor | $1,100 - $1,800+ |
| Total Professional Job | $1,300 - $2,800+ |
Frequently Asked Questions (FAQ)
Can I just use an A/C stop-leak product?
It is strongly advised not to use stop-leak products. They can clog not only the leak but also critical components like the expansion valve, receiver/drier, and even the compressor. This can lead to a much more expensive repair down the road.
How do I know if my Discovery has rear A/C?
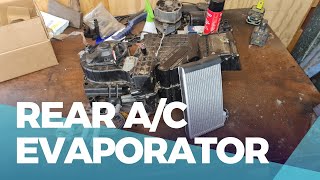
Vehicles with factory rear air conditioning will have a separate set of controls for passengers in the back and vents in the headliner or rear console area. These systems have a second, separate evaporator core located in the rear of the vehicle, which is a different part number and a separate repair procedure.
Is a leaking A/C evaporator dangerous?
While R134a refrigerant is not highly toxic in small, well-ventilated quantities, inhaling it directly is not safe. The primary danger of a leak is to the environment and the cost of the repair. The musty smell from a clogged evaporator, however, is due to mold, which can be a health concern for occupants.
My A/C isn't blowing at all. Is that the evaporator?
If no air is coming from the vents at any fan speed, the problem is more likely with the blower motor, blower motor resistor, or a fuse/relay, not the evaporator itself. The evaporator's job is to cool the air, while the blower motor's job is to move it.
Helpful Videos

Technical Specifications
OEM Part Numbers: AWR3014 BTR4048 BTR4446 BTR5292 BTR7363 BTR9450 JDF100000 JOF100000 JQB101330 STC3139 STC3152
Material: Aluminum. Refrigerant Type: R134a.
We Have This Part in Stock




The information in this article is provided for general reference and educational purposes only. Vehicle specifications, procedures, and part compatibility can vary by production date, trim level, and region. Always consult your vehicle's factory service manual and verify part numbers before purchasing or performing repairs. Safety-critical components such as airbags, seat belts, and braking systems should be installed by a qualified professional.
- Land Rover Discovery:
- 🎬 Helpful Videos
- 🛍️ Shop This Part
- Critical Compatibility: Discovery I vs. Discovery II
- Symptoms of a Failing A/C Evaporator Core
- 1. Weak or Warm Air from Vents
- 2. Musty or Sweet Smell
- 3. Visible Refrigerant Leak Inside the Cabin
- 4. A/C Compressor Clutch Cycles Rapidly or Not at All
- Known Issues, TSBs, and Recalls
- Diagnosis and Confirmation
- Buying a Used A/C Evaporator Core
- Replacement Overview & Difficulty
- Cost Breakdown
- Frequently Asked Questions (FAQ)
- 🎟️ Get 5% Off